Flutter - Build apps for any screen
Welcome to this in-depth Flutter tutorial! Whether you're a seasoned developer or completely new to programming, this guide will walk you through everything you need to know to start developing with Flutter. Let's begin our journey into the world of cross-platform app development!
What is Flutter?
Flutter is Google's UI toolkit for building beautiful, natively compiled applications for mobile, web, and desktop from a single codebase. It allows developers to create high-performance, visually attractive apps that run smoothly on various platforms.
Why Flutter?
For developers familiar with other cross-platform frameworks like React Native, you may wonder what sets Flutter apart.
Most cross-platform frameworks function by creating an abstraction layer over the native Android and iOS UI libraries. This layer attempts to harmonize inconsistencies between the platforms. Typically, app code is written in an interpreted language such as JavaScript, which communicates with the underlying native libraries (Java for Android or Objective-C/Swift for iOS). While effective, this approach introduces significant overhead, especially when frequent interactions occur between the app logic and the UI layer.
Flutter takes a fundamentally different approach. Instead of relying on the platform’s native UI components, it bypasses these libraries entirely in favor of its own widget set, built from the ground up. Flutter's visuals are rendered using the Skia graphics engine (or the Impeller engine in the future). The framework compiles Dart code directly into native machine code, ensuring performance close to that of natively developed applications.
By embedding its own copy of the rendering engine (Skia/Impeller), Flutter enables developers to leverage the latest performance optimizations without being dependent on the OS version of the target device. This design consistency extends beyond mobile platforms, offering a unified development experience across Windows, macOS, and other supported environments.
How Flutter Works?
Flutter's architecture and rendering mechanism are designed to provide a smooth, efficient, and consistent user experience across platforms. Let's dive into the key components and processes that make Flutter work.
Flutter's Architecture
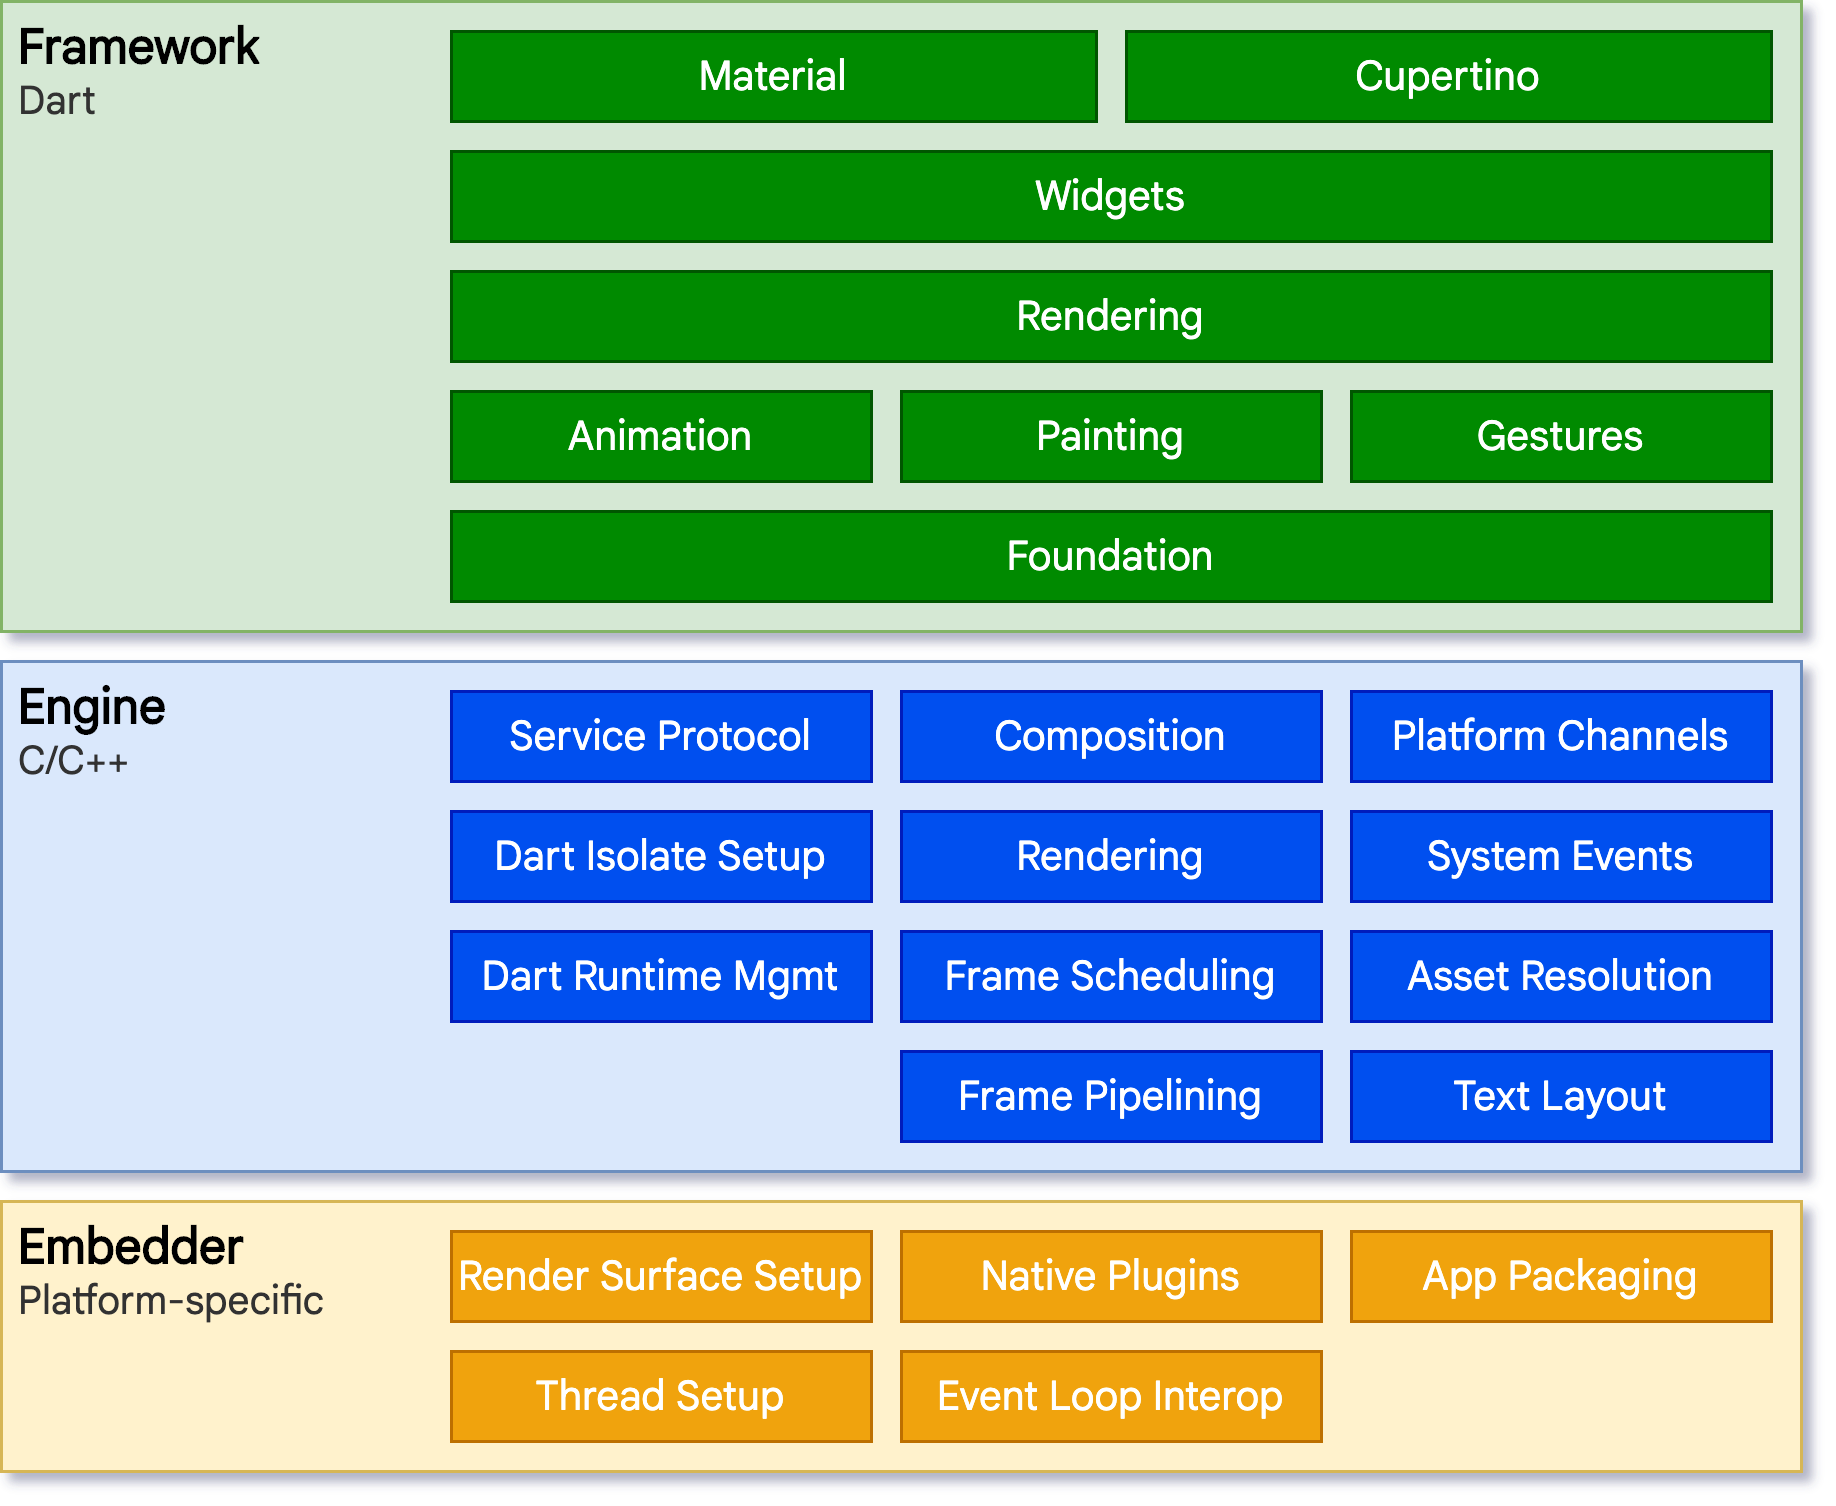 Flutter's architecture is composed of three main layers:
1. Framework: This is the topmost layer, written in Dart, which developers interact with most frequently. It includes a series of libraries for handling animations, gestures, and rendering.
2. Engine: The middle layer, primarily written in C++, is responsible for the core functionality of Flutter. It handles graphics rendering, text layout, and provides the Dart runtime.
3. Embedder: The bottom layer that interacts directly with the platform-specific components. It manages the event loop and provides access to native services.
Flutter's architecture is composed of three main layers:
1. Framework: This is the topmost layer, written in Dart, which developers interact with most frequently. It includes a series of libraries for handling animations, gestures, and rendering.
2. Engine: The middle layer, primarily written in C++, is responsible for the core functionality of Flutter. It handles graphics rendering, text layout, and provides the Dart runtime.
3. Embedder: The bottom layer that interacts directly with the platform-specific components. It manages the event loop and provides access to native services.
Widget, Element, and RenderObject Trees
Flutter uses three interconnected trees to manage the UI: - Widget Tree: Describes what the UI should look like. - Element Tree: Represents the instances of widgets in the tree. - RenderObject Tree: Handles the actual layout and painting of objects on the screen.
Rendering Mechanism
- The UI thread in the Dart VM executes the application code and Flutter framework code.
- It builds, lays out, and paints the Widget, Element, and RenderObject trees.
- The resulting Layer tree, containing drawing instructions, is passed to the GPU thread.
- The GPU thread uses Skia (Flutter's graphics engine) to rasterize and composite the Layer tree.
- The composited frame is then displayed on the screen.
This architecture allows Flutter to maintain high performance and consistency across platforms, as it doesn't rely on native UI components but instead draws every pixel of the UI itself.
Reactive UI and State Management
Flutter employs a reactive programming model. Widgets respond to changes in state, automatically updating the UI when necessary. This is facilitated by Flutter's distinction between Stateless and Stateful widgets.
An Example of Stateless Widgets
Stateless widgets are immutable and their properties can't change over time. They're ideal for parts of the UI that depend only on the configuration information and the BuildContext.
import 'package:flutter/material.dart';

class GreetingWidget extends StatelessWidget {
  final String name;

  const GreetingWidget({Key? key, required this.name}) : super(key: key);

  @override
  Widget build(BuildContext context) {
    return Text('Hello, $name!');
  }
}

// Usage
GreetingWidget(name: 'Alice')
An Example of Stateful Widgets
Stateful widgets are mutable and their properties can change over time. They're ideal for parts of the UI that depend on user interaction or dynamic data.
import 'package:flutter/material.dart';

class CounterWidget extends StatefulWidget {
  const CounterWidget({Key? key}) : super(key: key);

  @override
  _CounterWidgetState createState() => _CounterWidgetState();
}

class _CounterWidgetState extends State<CounterWidget> {
  int _counter = 0;

  void _incrementCounter() {
    setState(() {
      _counter++;
    });
  }

  @override
  Widget build(BuildContext context) {
    return Column(
      children: [
        Text('Count: $_counter'),
        ElevatedButton(
          onPressed: _incrementCounter,
          child: Text('Increment'),
        ),
      ],
    );
  }
}

// Usage
CounterWidget()
State Management with BLoC Pattern
Flutter's BLoC (Business Logic Component) pattern is a robust and popular choice for managing state. It encourages a clean separation of concerns, which helps make applications not only scalable but also easy to maintain. I’m excited to delve into how it's used in real applications. Here’s a detailed guide with examples from the NSF Resilience App repository to get you started!
Core Concepts
- Events: These are actions that trigger state changes, typically originating from user interactions or external data.
- States: Represent the current state of the application, consumed by the UI.
- BLoC: The core component that maps incoming events to outgoing states.
Detailed Implementation
Defining a BLoC
Here’s an example of how a BLoC class is defined. In this case, the AppBloc listens for events and updates states accordingly. One of the key events handled is changing the mode of the app.
In the context of the Resilience project, the mode refers to the type of emergency scenario the app is currently handling. The app can be in one of three modes:
- Emergency Mode: The app operates in a real emergency response mode, allowing users to access critical disaster information and communicate urgent needs.
- Test Emergency Mode: The app is in a testing state, simulating emergency conditions without the full functionality of an actual emergency.
- Normal Mode: The default operational mode, where the app functions without the emergency-specific features.
For example, when a user interacts with the app’s interface to declare an emergency, a dialog will prompt them to select either Emergency, Test Emergency, or Cancel. Depending on their selection, the app will switch to the corresponding mode.
Here’s how the AppBloc handles the mode change event:
class AppBloc extends Bloc<AppEvent, AppState> {
  final AppRepository _appRepository;

  AppBloc({required AppRepository appRepository})
      : _appRepository = appRepository,
        super(const AppState()) {
    on<AppOnModeChanged>(_onModeChanged);
    // other event handlers...
  }

  // Event Handler for Mode Change
  void _onModeChanged(AppOnModeChanged event, Emitter<AppState> emit) {
    emit(state.copyWith(mode: event.mode)); // Update the app state with the new mode
  }
}
Defining Events and Modes
The AppOnModeChanged event allows the app to handle mode changes based on the user's interaction with the dialog. Here's how the event is defined:
class AppOnModeChanged extends AppEvent {
  final String mode;

  AppOnModeChanged(this.mode);

  @override
  List<Object> get props => [mode];
}
The mode can be one of the following:
- emergency: The app switches to emergency mode.
- test: The app enters test emergency mode.
- normal: The app reverts to the normal mode.
This event allows the app to dynamically switch between different modes based on the user’s input, enabling the app to function properly in various disaster scenarios.
Mode Change Example
In the Resilience project, when a user decides to declare an emergency, a dialog appears asking whether they want to enter Emergency Mode or Test Emergency Mode. If they select Emergency, the app will transition to Emergency Mode, and if they select Test, the app will switch to Test Emergency Mode.
Future<void> _showModeDialog(BuildContext context) async {
  return showDialog<void>(
    context: context,
    builder: (BuildContext context) {
      return AlertDialog(
        title: const Text('Declare Emergency'),
        content: const Text('Do you want to declare an Emergency or Test Emergency?'),
        actions: <Widget>[
          TextButton(
            onPressed: () {
              context.read<AppBloc>().add(AppOnModeChanged('emergency'));
              Navigator.of(context).pop();
            },
            child: const Text('Emergency'),
          ),
          TextButton(
            onPressed: () {
              context.read<AppBloc>().add(AppOnModeChanged('test'));
              Navigator.of(context).pop();
            },
            child: const Text('Test'),
          ),
          TextButton(
            onPressed: () {
              Navigator.of(context).pop();
            },
            child: const Text('Cancel'),
          ),
        ],
      );
    },
  );
}